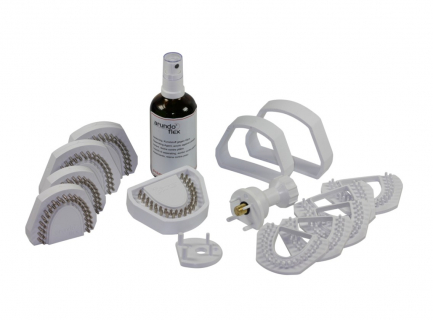
Fingerprint Preparation
1. Process the print so that all protruding outward and excess areas (such as protruding folds) are removed. For OK prints, the top of the sky should be straightened.
The more carefully the print is processed, the lower the impression becomes.
2. Attach the cuff (3) to the base plate (1), and only process the base plate with the insulation spray supplied with the kit. Spray the insulating spray with a thin layer and blow lightly on the film.
NOTE: While the insulating film is drying (approximately 1-2 minutes), sanitize the print as usual. After the insulating film has dried, the surface of the base plate becomes dull.
Filling a fingerprint / making an impression
3. Fill the print as usual, fill the base plate (1) with gypsum as well.
The filled print is placed on the base plate in accordance with its center
Gypsum protruding beyond the edges is carefully removed using a gypsum knife.
4. After holding the plaster, the spoon is removed.
The white cuff (3) is removed, then the base plate (1) is detached from the split plate (2) to open the holes for the ejector device.
5. The ejector device (5) is inserted from the bottom side of the base plate into the holes provided for this.
Using the ejector device (5), carefully raise the tooth crown, while it will separate from the plate. If necessary, it is necessary to prevent the formation of distortions in the manufactured cast.
6. Use a dry or wet trimmer to grind the crown until the first row of special holes appears. When using a wet trimmer, the holes are freed from the gypsum immediately before the model returns to the base plate.
On the inside, an engine or a piercing mill is also suitable for turning.
NOTE:
In any case, pay attention to the fact that excess material should be sanded only to the boundary line, which is indicated by a small groove on the removable plate.
7. Before returning the impression to the base plate, it must be thoroughly washed with warm water and standard detergent.
For washing, a brush with a plastic bristle is best suited.
8. Finally, cut the crowns into individual segments mechanically using special equipment or using hand tools.
After that, all segments must be thoroughly cleaned of gypsum dust (using a brush or steam emitter) and returned to the washed base plate.
-
Small cap - 3 pcs. Large base - 2 pcs. Small archival stand - 3 pcs. Large archival stand - 2 pcs. Ejector key with two removable plates (under the large and small base) -1 pc. Small cuff - 2 pcs. Large cuff - 1 pc. Insulating fluid 100 ml -1 pc. 1. Base plate
-
Baumann Dental
-
США


No comments yet